Saturday, March 31, 2012

Saturday in the Studio

I went shopping.


I bought myself an adorable (reusable shopping) bag.


That was filled with delightful goodies!


Five hoops and three different colours of embroidery thread, plus three different fabrics that I'll be making into dresses. I'll of course be blogging about my dress making exploits because I won't be using a pattern, per usual. And naturally, I'll be posting my embroidery to here as well! Depending on how things with those little guys go, I may start posting them on etsy! If you look carefully in the photo, you can see some of the new Jewelry I'm working on, and shamefully neglecting to work on. I've just been so frustrated with messing up on those little paintings and having to start all over again. But soon, soon. Also, you can see my goal list that I got from the oh-so-wonderful Rachel at Cornflower Blue Studio! There's a little DIY list on the side of her blog that I really recommend you check out! 

Anyways, I hope you all have a wonderful weekend!

Love and Strawberry Kisses xo

Thursday, March 29, 2012

A little lovely embroidery


This is what I was up to yesterday when I was supposed to be working on a lot of other things! But in the end, I suppose procrastinating working on art with other art isn't all that bad. I had so much fun doing this, it was the first time I've ever done embroidery. Of course I did it free hand because I like to make things difficult on myself. I did base it on a drawing I made in my sketchbook a few months back which you can see here! I had dreams of screen printing the design, but have yet to sit down and actually figure out how to do that...

I already have another design worked out in my head, so I just need to get another hoop and some blue thread! I really should finish my next batch of jewelry first. Not only will there be more necklaces, I'll have earings, rings and even cuff-links up for sale on my etsy. I'm also working on a larger painting, and of course my story as well. With that said, I should probably get back to painting!

Love and Strawberry Kisses xo

Tuesday, March 27, 2012

How Tuesday: Hungry, Hungry ipod/phone/touch Monster Case!


So when I received my first paycheck after coming back home, I immediately cashed it and bought myself an itouch. To be fair, I had just worked 12 days in a row, and made a good deal of money with overtime alone. Considering the fact that my job doesn't allow me to wear headphones, but will allow me to play the radio, I figured I’d acquire one so I could listen to my own music as I cleaned up the kitchen after hours.  My reputation for dropping/ruining/soaking technology is well known throughout the WNY region- and so I figured I’d make  a cute little case to carry mine around in! It's not the most helpful at preventing spills or stopping me from dropping it, but I like to think it's safer tucked away inside this knitted monster's tummy.

When I knit, I don’t use patterns, only because for some reason my brain can’t piece the two together. So all and all I did this little dude by the seat of my pants, but made sure to document each step as I went along!

Materials:
Yarn (I used a Lion’s Brand yarn of medium weight)
3 double ended needles
Buttons (optional)
1 crochet hook or yarn needle

Step one.


Cast on 24 stitches- or the amount of stitches it takes to wrap around your piece of technology. Just remember! Yarn stretches, and you don’t want it to be too loose. 

Step two.


Evenly divide amongst three double ended needles.

Step three.


Knit all the way until the length is about 3/4ths of the finished desired length. If you’re doing this for an iphone/itouch, it’s about 3 inches. Knit until you've reached the stitch directly above where you started, knit 12 more stitches (or half of the stitches you made) and then bind off the remaining 12.

Step four. 


Cast on 12 stitches onto unused needle.

Step five.

Begin knitting as if nothing happened! Take the 12 new stitches and knit into where you had previously bound off. Keep knitting and slide the stitches between the three needles as before. After a few rows it will look like this:


Step six.
Continute knitting until desired length is reached and then bind off all stitches. When you cut the yarn, leave enough to stitch the end shut, using either a crochet hook or a yarn needle. This is my half shut monster progress:


Make sure to do this for both ends, and you have a monster base!


Step seven.

Now. There are many things you can do for your monster. I gave him arms and legs and eyes and ears! I even gave him a little nose.


Isn't he a cute little bugger?

Instead of telling you how to go about these things, I'm going to leave it up to your imagination! Because what fun is it if you don't do a little creative exploring all on your own?

As I told my younger sister; whenever he get's hungry, he eats my ipod and holds it for me in his tummy!

Love and Strawberry Kisses xo

Sunday, March 25, 2012

Sunday in the Studio

I have several tattoo commissions waiting for me to tackle them on my desk right now, but for starters here is the one I've most recently completed! It's of a Tektite from the Zelda games to be placed on the right shoulder. I'm a huge nerd, especially for the Zelda games, so when I received an email about doing such a commission, I was a little bit more than exited. I was allowed to take liberties with the design of the Tektite, and created a hybrid of the orange tektite from Legend of Zelda and Gohma (the boss version) from the same game. In any case, I had loads of fun!


Friday, March 23, 2012


So. There's this thing that I do. Aside from occasionally abusing alliterations, I set the background of my phone or computer or ipod to a motivational quote, or image. A silent reminder of sorts of something that I want, or need to remember. I have a picture of a lovely little cabin in the woods as the background on almost everything telling me "Soon, soon this will be yours." Because right now, I want nothing more than my cabin and the smell of the wild air every morning. In any case, at the beginning of the year "I just wanna make art, read books and find someone who likes me enough to kiss my face" was my mantra. I posted it EVERYWHERE. Because honestly, what more could I want? I do suppose a few things, but it got to the core of what I wanted.

And I have it. All of it.

Did I ever think this was going to happen? No, not really. Especially not within such a short time. But it did. I've spent the past two days pumping out new Jewelry (that I'll hopefully have posted to etsy by the end of the week,) drawing out scenes from the book I'm working on, on top of getting the first chapter written out and working on two oil paintings. Which only seems like a lot when I write it down. 

It's always been my dream to be a self sufficient artist, and watching everything unfold is almost magical. I make enough to buy books, and I have have the time to read them as well. When I'm not reading, I'm painting or knitting- or doing some form of creating. And totally got that rather swell guy who not only likes me enough to kiss my face, but he'll hang around even when I'm a sick (and so very gross) mess. 

Keeping a mantra, or an image of what I want is so helpful in keeping me on track to my dreams. Mostly because I'm easily side-tracked and alas, forgetful. But in closure, here's a lovely post from the wonderful Gala Darling on setting amazing goals! I know I have a list tacked above my desk with my goals for the year- one of those things just so happened to be starting this blog. So here's to dreams come true!

Love and Strawberry Kisses xo

Wednesday, March 21, 2012

A Workin' Wednesday

I really do like alliterations! Today was supposed to be a day spent indoors and working, but it's just too lovely outside to even think about not sitting outside and soaking up the sun! I did go to Creative Essence earlier today to pick up some jewelry goodies with my younger sister, and when we returned home we promptly rolled out a blanket on the back deck. I began working, she began tanning. So here are some snapshots of some goodies to come! 


And here are some lovely shots of my Willow Tree!
        
And the Magnolia Tree!


And my toes in the grass, which I'm going to vote as one of the best feelings that spring brings along!


Monday, March 19, 2012

A Musical Monday


I'm probably one of the only people who love Mondays, but going in line with things I love-this song is probably one of the most beautiful things I have ever heard.


"Your hand in mine, my fingers in your veins connected 
our bones grown together inside 
our hands entwined, your fingers in my veins braided 
our spines grown stronger in time 
because our church is made out of shipwrecks 
from every hull these rocks have claimed "


Love and Strawberry Kisses xo

Saturday, March 17, 2012

Saturday in the Studio

The weekend is finally here again! Which means more time spent in the studio for me! Right now I'm working on putting together  a book (probably several by the time I'm actually done) on a idea I had a few years back, and after spending all this time letting it fester in my brain and researching facts at the library I figured it was indeed time to begin this venture. So here are some sketches I've made over the past few days!


Thursday, March 15, 2012

On Better Days


I was so certain I was going to die cold and alone and starving. I was so certain that city was going to be the end of me, and I would never escape it. Not ever. I was just so certain.

I was doomed.

Short on rent, no food in my fridge, and scraping together all my spare change so I could simply get to work. I thought maybe, just maybe if I just got through this month. and then the one after that I would be fine, that I could be happy again. I would take a deep breath, and keep moving. I mean, if everyone else could do it, why couldn't I? Not everything is for everyone, and it would take a few months too long for me to fully realize this. Luckily, for me, it took a very short Christmas-trip home to my parents to throw everything into a painful perspective. Within four days of returning to my (tiny and windowless) apartment I had everything packed up. I left without looking back.

After just a few days of returning to my hometown in WNY, I had an awesome job, I had my studio going in full swing, there was food in the fridge for me to eat, I was surrounded by people who loved me- and I even started a relationship with this pretty swell guy. And now. when I think back on it all I can ask myself is "Why didn't I do this before?" I was so ready to over the summer. and again early in the fall. I thought then that those were my darkest days, and it just had to get better. So I ignored the string attached to my heart tugging me in the direction of home, and closed my ears to the quiet beckoning.

It's now I realize that sometimes. no matter how much we want good days to be abundant in our lives again- they won't happen until we give in- and let them.


Love and Strawberry Kisses,
Darling xo 

Tuesday, March 13, 2012

How Tuesday: Pretty Simple, Pretty Awesome Greeting Cards.

Who doesn't love little hand-made how-do-you-do's? I'll walk you all through step by step on how to make your own little greeting cards!


Materials:


Plain Heavy Weight Paper (Bristol Board will do just fine!)
X-acto Knife, or any box-cutter really.
Pencil and Eraser (I use a 3h pencil for all of my sketching, just because it's light and easily erasable!)
Something to ink up your super cool cards! Be it marker, pen or brush, that's up to you!

Step one.


Measure out the size of your greeting card!
It's 5.5 inches tall and 8.5 inches wide (with a line drawn at 4.25 to mark the fold line)

Step two.


Cut out carefully along the line, and viola!


Step three.


So here, to make the card much easier to fold, we're going to make a little sort of half cut in the paper. Instead of pressing the blade all the way through the paper, just lightly run it along the line drawn for the fold.


Folding made easy!

Step four.

I drew lines 1.5 inches for the boarder all around, to get a general idea of where I wanted the text. I then added a 1/2 inch to the sides and top as shown below:


I've also divided the space into thirds so all the letters remain evenly sized.

Step five.


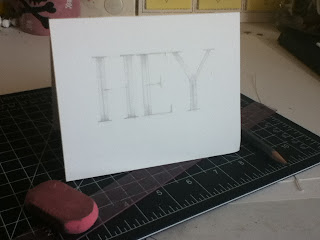
This is the "skeleton" of the letters , because they're pretty much the inner bare bones of the letters we're going to be making!

Step six.


So to put some meat on these bones you can take a ruler to measure out everything, or take a small piece of paper and mark the desired width of the letter to use for a consistent size! And if you're feeling fancy, you can add serifs! I sure did:


And this is what it'll look like when it's all penciled out!


A note on the E and Y; The three horizantal lines for the E are all different sized, the longest being on the bottom, and the shortest being in the middle. The serifs are half the size on the bottom and top, and full sized on the middle line. For the Y, the weight is heavy on the left side, and lighter on the right. I made the right side half the width as the left and vertical line.

Step seven.


Ink it on up! Above is the outline which I did with a 005 micron, and shown below is the final product! I used a brush mircron to fill in the letters, and the sharpie to make the boarder.


Pretty darn awesome, if you ask me.


Now all that's left is for you to write up a lovely little note to whichever darling you wish to and send it off!


Love and Strawberry Kisses xo 

Sunday, March 11, 2012

Sunday in the Studio


I spend almost all my time painting, drawing and knitting. But recently I've been pretty busy and on the fly more and more with less time to spend on large paintings. I was enlightened to a lovely solution after visiting a little craft store down the road from where I live, the owner told me about how she had been  making necklaces with  images she created and sent me home with a plethora of ideas and some lovely jeweler's resin (along with a few skeins of wool and a few other delightful assortments.) These little trinkets just happen to be the result!


I still have yet to pour resin on these, but that's my plan for the coming days, and I will be sure to keep you all updated!

Love and Strawberry Kisses xo